
This post outlines the general framework and the usual sequence of clinical assessment.
Mastering the art of clinical examination is a journey of evolving from a rigid observer to a physician with sharpened, instinctive awareness
The Evolution of Clinical Instinct
In the initial phase, mostly 3rd, 4th & 5th semesters of MBBS: Observation begins as a rigid, conscious checklist.
The Transition: Over time, you begin noticing subtle diagnostic cues in everyday life, even in people you see on the street.
The Expert Phase (Mastery): Observation stops being a deliberate checklist and becomes an automatic habit. This instinctive, trained awareness is what truly sets a master physician apart.
Objectives of Physical Examination
The primary goals of the physical examination are to:
1. Confirm or refine diagnostic hypotheses formulated during history taking.
• Identify findings that either support or exclude these hypotheses.
3. Detect occult or early asymptomatic clinical signs.
4. Establish an objective baseline for monitoring the patient's disease trajectory.
History and Examination MUST be SEPARATE Sections
In practice, history-taking and physical examination are fluid and simultaneous.
• Observation begins at the first meeting, and
• New findings during the exam may prompt additional questions.
However, in presentation (such as when reporting to a senior), the two must remain strictly distinct:
• Questioning belongs in the ‘History’ section, and physical findings belong in the ‘Examination’ section.
Clinical Observation Begins the Moment You Meet the Patient.
Key early indicators include:
Gait & Posture: Provides insights into neurological function, joint mobility, motor control, and psychological state. Common abnormalities stem from pain, joint restrictions (like osteoarthritis), neuromuscular deficits (like foot drop), or coordination disorders (like ataxia).
In-Bed Posture: Look for resting alignment, asymmetrical limb placement, and signs of respiratory distress, such as tripod positioning.
The Handshake: Provides immediate feedback on skin temperature, moisture, neuromuscular tone, and grip release speed.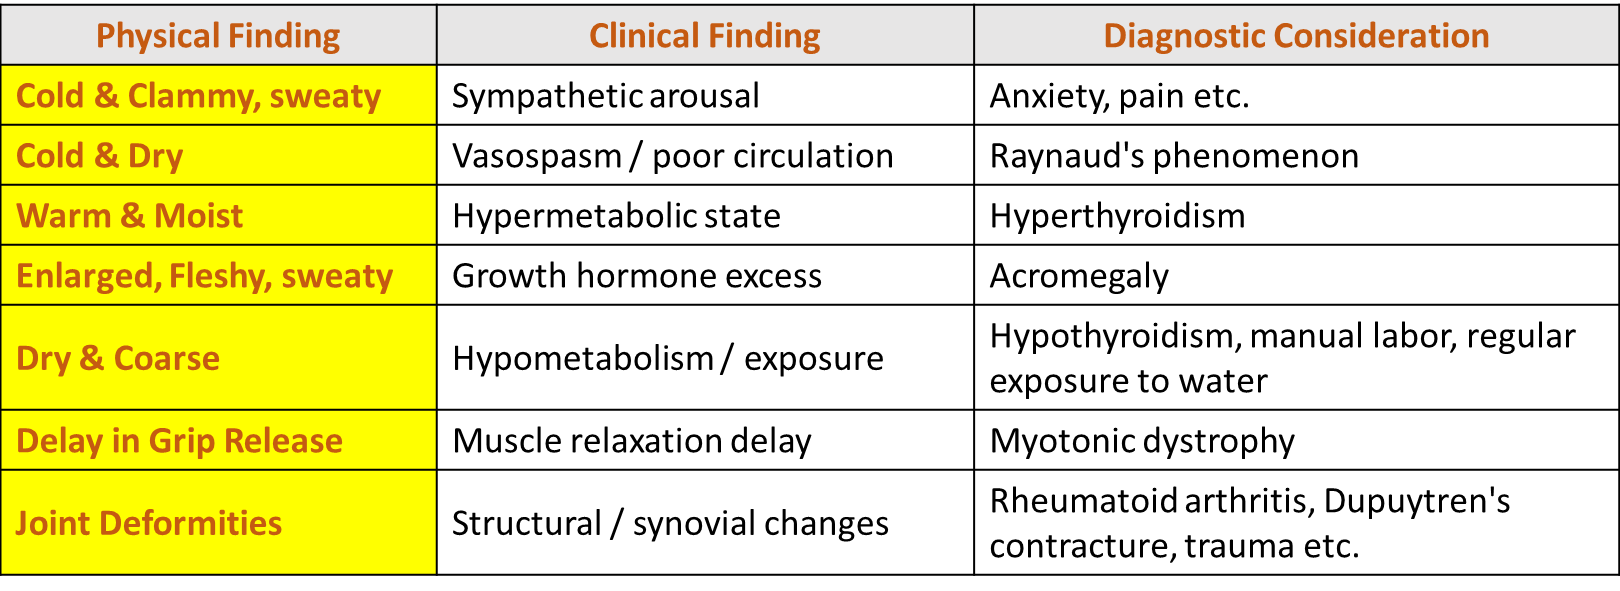
Facial Expression & Demeanor: Reflects both physical and mental well-being.
Ask yourself, "Does this patient look acutely unwell, toxic, or in distress?"
*Note that eye contact expectations vary across cultures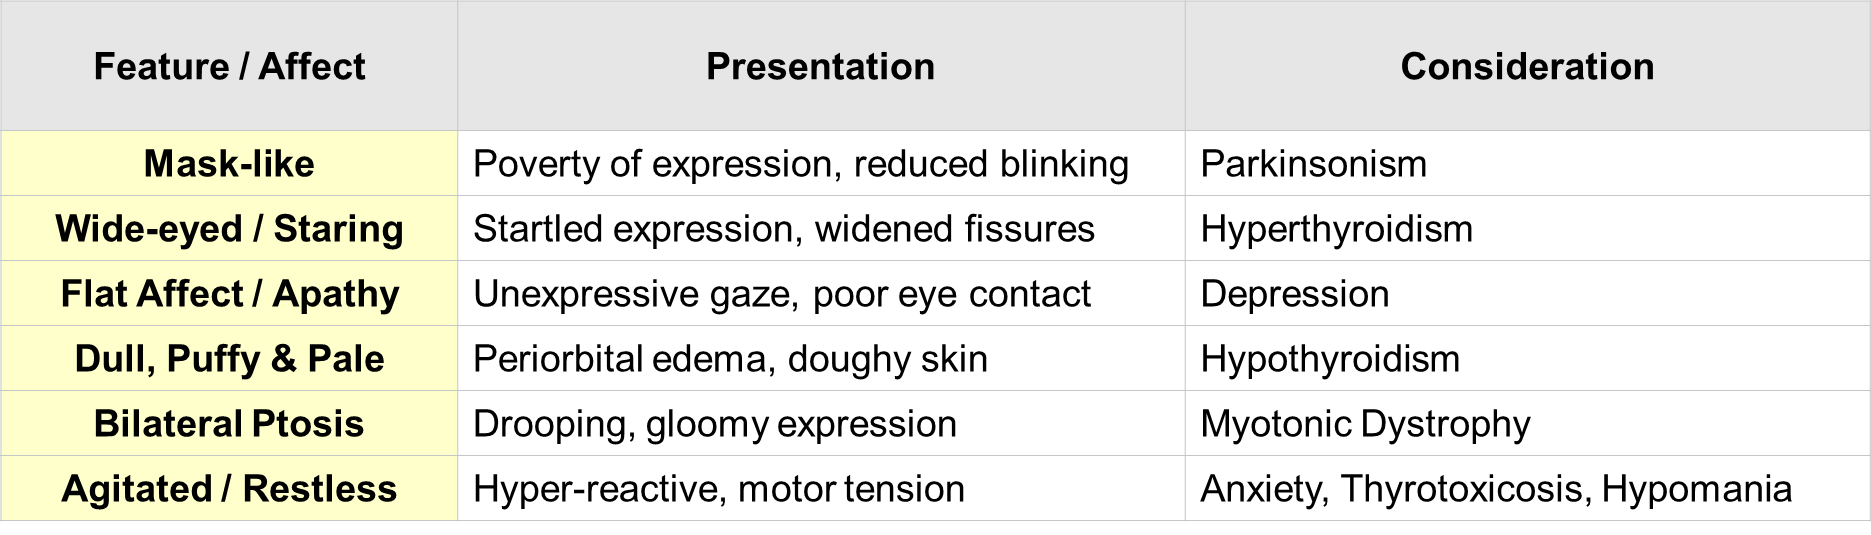
Clues from Clothing, Grooming, and Accessories
A patient’s appearance can provide vital information regarding their cognitive status and self-care:
Unkempt or Soiled Clothing: May suggest
• Severe psychiatric illness or substance abuse in younger patients, or
• Dementia and a lack of caregiver support in the elderly.
Oversized/Baggy Clothes: Often used to hide severe weight loss, cachexia, or altered body image (anorexia nervosa).
Tattoos: A reminder to evaluate for blood-borne viral infections like Hepatitis B/C and HIV.
MedicAlert Accessories: Signal critical conditions like adrenal insufficiency, severe allergies, anticoagulation, or epilepsy.
Essential Prerequisites for the Clinical Encounter
Before beginning the examination, five essential steps must be followed:
1. Optimal Environment: Ensure
• privacy, quiet, and
• bright natural light (essential for seeing subtle color changes like mild jaundice and pallor).
2. Informed Consent: Clearly explain the procedure and obtain explicit verbal consent.
3. Chaperone Policy: Essential
• When a male doctor examines a female patient.
• For intimate examinations (rectal, vaginal, breast)
4. Dignity & Draping: Expose only the specific region being examined while keeping the rest of the patient covered.
5. Infection Control: Wash hands and sanitize equipment in full view of the patient.
Triaging and Positioning
Assess the severity immediately:
• Is the patient stable or critically unwell?
• Prioritize stabilization and emergency care for unstable patients before a comprehensive exam.
The Clinical Examination:
Standard Position:
1. Stand at the patient’s right-hand side.
This provides optimal access for assessing Jugular Venous Pressure (JVP), apical impulse palpation, and abdominal palpation.
2. Patient Elevation: Place the patient semi-recumbent at roughly 45° elevation.
Exception: Avoid repositioning individuals in severe distress (e.g., orthopnea or peritonitis); examine them in their position of greatest ease.
The Framework: GPE and Systemic Examination
A standard routine generally involves a General Physical Examination (GPE) followed by a Systemic Examination (SE).
General Physical Examination (GPE)
This is a holistic evaluation of general status, including:
• General appearance, build, posture, and consciousness.
• Vital Signs: Pulse, BP, Respiratory Rate, Temperature, and SpO₂.
• Cardinal Signs (PICLE): Pallor, Icterus, Cyanosis, Clubbing, Lymphadenopathy, and Edema.
Systemic Examination (SE)
This refers to the examination of specific organ systems, such as the Respiratory, Cardiovascular, Abdominal, Genitourinary, Musculoskeletal, and Nervous systems.
The IPPA Framework
A systematic examination follows a step-by-step routine to ensure no detail is missed:
1. Inspection: Visual observation of symmetry, color, lesions, and respiratory movement/distress before touching.
2. Palpation: Tactile evaluation for temperature, tenderness, organomegaly, masses, and vocal fremitus.
3. Percussion: Tapping body surfaces to delineate organ boundaries and distinguish resonant from dull tissues.
4. Auscultation: Listening to internal sounds (heart valves, lung fields, bowel motility).
Required Equipment:
A complete examination requires several tools, including a stethoscope, pen torch, measuring tape, ophthalmoscope, otoscope, sphygmomanometer, tendon hammer, tuning fork, thermometer, accurate weighing scales etc.
References:
• Hutchison's Clinical Methods (24th ed.).
• Macleod's Clinical Examination (13th ed.).
• Bates' Guide to Physical Examination and History Taking (12th ed.).